Building Frame for Electric Fireplace [Latest Design 2023]
Want to build a frame for your electric fireplace? You have come to the right place, then.
I will guide you through the requirements and steps and ensure you increase the beauty around your electric fireplace by building an excellent frame.
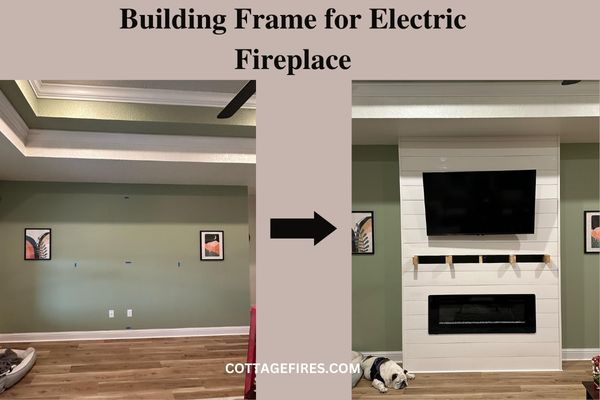
Also I have shared some pictures from choosing location, frames to final product built at my friends house.
Let’s dive in, then!
Types of Electric Fireplaces Inserts
To know what type of frame would be the most suitable for your fireplace, let us see various types of electric fireplace inserts that will bring clarity and direct you toward the best frame for you.
There are 5 types of electric fireplace inserts –
- Built-in electric fireplace inserts – These are designed for permanent installations and are cost-effective and easy to install. Being one of the safest ways to heat and warm your room(s), they can heat up to 1000 sq. ft of area.
- Plug-in electric fireplace inserts can be placed into an existing fireplace or mantel. These come with a ton of features alongside realistic flames as well. With good efficiency, they can end up having a range of 1000 sq. ft of area.
- Log set electric fireplace inserts – These are the simplest way to a quick upgrade if you have an existing fireplace. You are ready to go when you place it in the firebox and plug it in. The only drawback is that there are only a few unique options, but depending on which heater you choose, this insert can heat an area of 400-1000 sq. ft.
- In-wall electric fireplace inserts – These resemble built-in electric fireplace inserts but can have a size range of up to 100 inches. Remember that some models require clearance around your chosen electric fireplace. These have recently gained popularity and have many options to choose from.
- Multi-sided and & see-through electric fireplace inserts – These allow you to view the room from different sides. They are perfect for you in every aspect bringing in the most realistic experience as they are packed with many impressive features.
Guide to Frame an Electric Fireplace
Below are the key points that need to be looked at before you start building the frame for your electric fireplace. Knowing each of them helps you broaden your scope and finalize the best possible outcome.
Choosing a Location
The first thought that will cross your mind is where to set up your electric fireplace. Always choose a place which has easy access to a power outlet. Electric fireplaces should be installed where they can prove to be most useful.
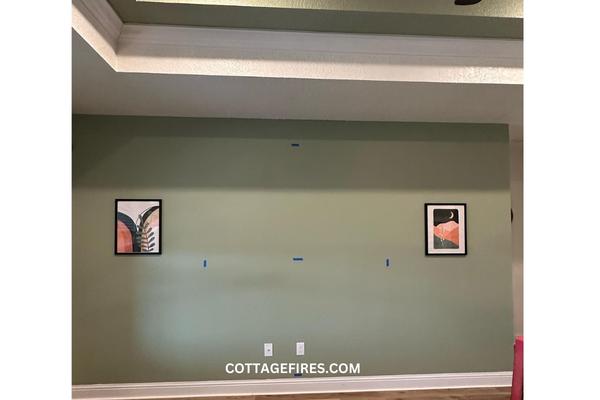
Generally, the center of the room is the ideal location for an electric fireplace. Provide a good amount of space around the setup of your electric fireplace; otherwise, you might end up with messy wires and an untidy look.
Buying an Electric Fireplace Insert
Choose an electric fireplace that matches you the most. Features, design, location, and heating range must be considered when buying an electric fireplace insert. The framing I shared in this article goes with linear electric fireplaces. We have separate guide on choosing linear electric fireplace.
Read the reviews and compare your chosen model with others to know exactly what you are buying. Lastly, be aware of your budget and do not compromise on quality in any context whatsoever.
Now, let’s see in depth all that is needed to build a frame for your electric fireplace.
Essentials to Build Frame for Electric Fireplace
Certain materials are required to build an elegant frame for your electric fireplace.
The materials needed are –
- Plywood,
- Wood screws,
- Pocket screws,
- Level,
- Caulking Gun,
- Tape measure,
- Sander,
- Table saw,
- Drill,
- Builders Square,
- Compound Miter Saw.
Step By Step Guide: Framing an Electric Fireplace Insert
Here are some step-by-step instructions for framing an electric fireplace insert to make your electric fireplace look more aesthetic and grab all the attention.
Building the Base –
The first step is to build a base strong enough to support the weight of your electric fireplace. Also, tighten the screws properly, so there is stability, and it stays sturdy while perfectly fitting.
Make sure the base is a proper rectangle holding the core of your frame. Cut a piece of plywood that will match the size of the width of the base of your model. This is to add support to the center.
Building the Frame –
Set up on a flat surface and assemble your model’s front using your pocket holes and screws. After assembling the front of your electric fireplace, wrap the frame around it.
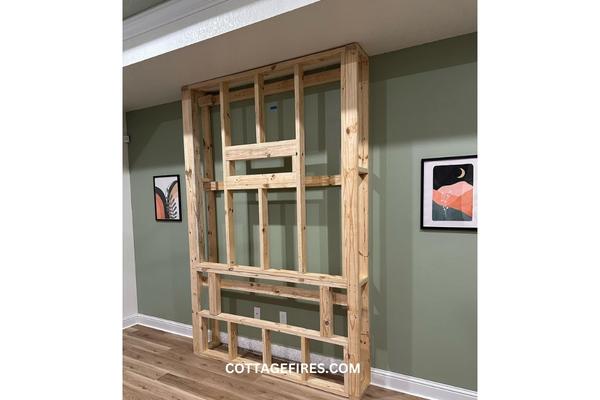
Remember – Concentrate on the height and the thickness of the frame and the base, respectively, while building the frame.
Covering Base with Plywood
Precisely cut every piece of plywood to match the accurate size using your table saw.
Then connect the well-cut plywood pieces on every side (left, right, front and top) of your electric fireplace.
Easy-to-obtain plywood will also work as the guarantor for a strong baseboard with the right specifications.
Install Frame around Base and Wall
This step is to be executed with extra care and concentration as you will have to use screws, nails, and even pocket holes to correctly attach not only the frames to the base but also to include the care needed for the central support.
Installing frames around the base and wall will bring the comfort needed for the mainframe to rest securely.
Covering Frame with Plywood
Cover the frame of your precious electric fireplace using plywood paired with a brad nailer.
Ensure you don’t forget to add the sides after taking care of the above step.
Shims are used in this step to modify the frame’s edges to ensure its secure attachment.
By completing this step, you have completely covered your frame in the most optimal way possible.
Adding Mantel to the top of the Fireplace
Place the plywood on the top of your electric fireplace and mark the spots you will need to cut off the plywood.
This way, you will know exactly the length required for the mantel and all you need to do after the above step is to bolt it with brad nails and a brad nailer.
Fill in Seams
There may be some spots that our measured trimmings could not cover. In that scenario, use wood filler to fill in those missed seams.
Do not skip over this step because this step will bring in the smooth edges and the look of the smooth finish we were hoping for.
Everything becomes perfectly balanced after this step, no?
Sanding and Painting Frame
Sanding your freshly built frame is the right way to go. This will help you easily paint the entire surface. Also, clean up all the wood and sawdust particles that appear after sanding. It is recommended to use a vacuum cleaner for the same.
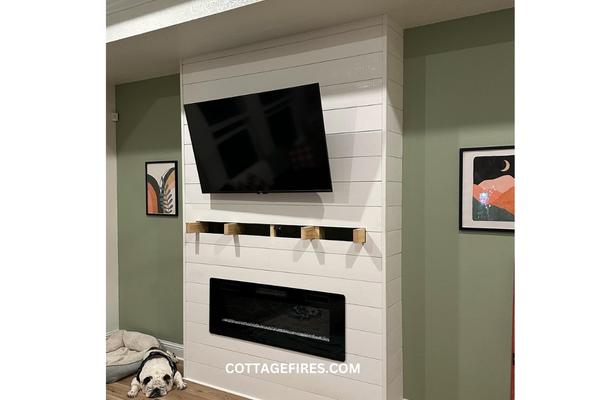
Wipe and let the surface be for 10 minutes, then go for the shade and color you want your frame to look awesome.
Conclusion
It is always interesting to build something by yourself, isn’t it? The steps I have will bring out your artistic side alongside the best results as well.
Be aware of what you are installing and go for a gorgeous frame to boost the concept and look of your electric fireplace.